Section 3. Managing Programs and Versions
3.A. Working with Program Data.
| Online | Offline | |
|---|---|---|
| Data from others | Download | Import |
| Data from users | Upload | Export |
Table 6 - Working with Program Data

Program data can be downloaded, uploaded, imported, and exported in QAT.
- Note that forecasting programs are entirely different from supply planning programs. Ensure you are in the correct module before downloading, uploading, importing or exporting.
- Users must Download program data to begin supply planning or forecasting and need to Upload their data back to the server to share their work with others.
- Uploading can be as "draft" or as "final". Uploading a supply plan program as "final" initiates the supply plan review process. The status of supply plan versions can be viewed in the Supply Plan Version & Review screen — this is the only function described in this section that is available to report viewers. Uploading a forecast program as "final" allows users to import that forecast directly into the supply plan module. See QAT Forecast Import for further instructions on how to import a forecast into a supply plan.
- When no internet is available, the Export feature allows users to share their data with other users via external devices such as a pen drive/flash drive, who can then use the Import data function to open that file on their computer.
- These functions can be accessed from the left menu bar under Program Management.
- Additionally, Download & Upload can be accessed from the top menu bar (see Top Ribbon Functions)

Figure 47 Menu Bar
3.B. Download/Delete.
-
Who? This function is available for Realm/Program Admins, Program Users and Supply Plan Reviewers. Not available or needed for Report Viewers.
-
When? The user must be online to download a program.
-
Why? Users should download a program if they want to enter or update data, or actively forecast or supply plan (instead of just viewing reports). Users may download a program when they notice that their local version is not the latest (i.e. when download icon is red instead of the usual blue). Downloading programs enable the user to work offline. However, note that programs must be downloaded to complete the following functions, even if the user is online:
- Supply Planning:
- Enter/update data (consumption, inventory/adjustments, shipments). For example, if the user is working on “Consumption Details”, he/she must select a program from the given list. The list will show data only for those “Programs” which have been downloaded in the local index database.
- Supply/scenario plan
- View QAT Problem List
- In reports, viewing the data on the local computer (as opposed to on the server)
- Forecasting:
- Enter/update data (enter/import actual consumption, add/edit forecast trees, extrapolate, etc)
- In validation or forecast analysis reports, viewing the data on the local computer (as opposed to on the server)
- Supply Planning:
-
What happens when a user downloads a program? When the user downloads a Program, it gets stored in the local index database in the JSON format.
-
How to Download a Program:
- Determine whether you would like to download from the forecasting or the supply planning module, and navigate to the correct module (See Section 2.J Navigation and Menu Bar). If you only have access to one module, you can ignore this step.
- Go to “Program Management” > “Download/Delete Program.” (Alternatively, access this screen by clicking the download icon
 in the top right bar in QAT). The screen will display the Program Data as shown in the below figure.
- Red text indicates that the program downloaded is not the latest version. Green text indicates that the program downloaded is the latest version. Black text indicates the program is not downloaded.
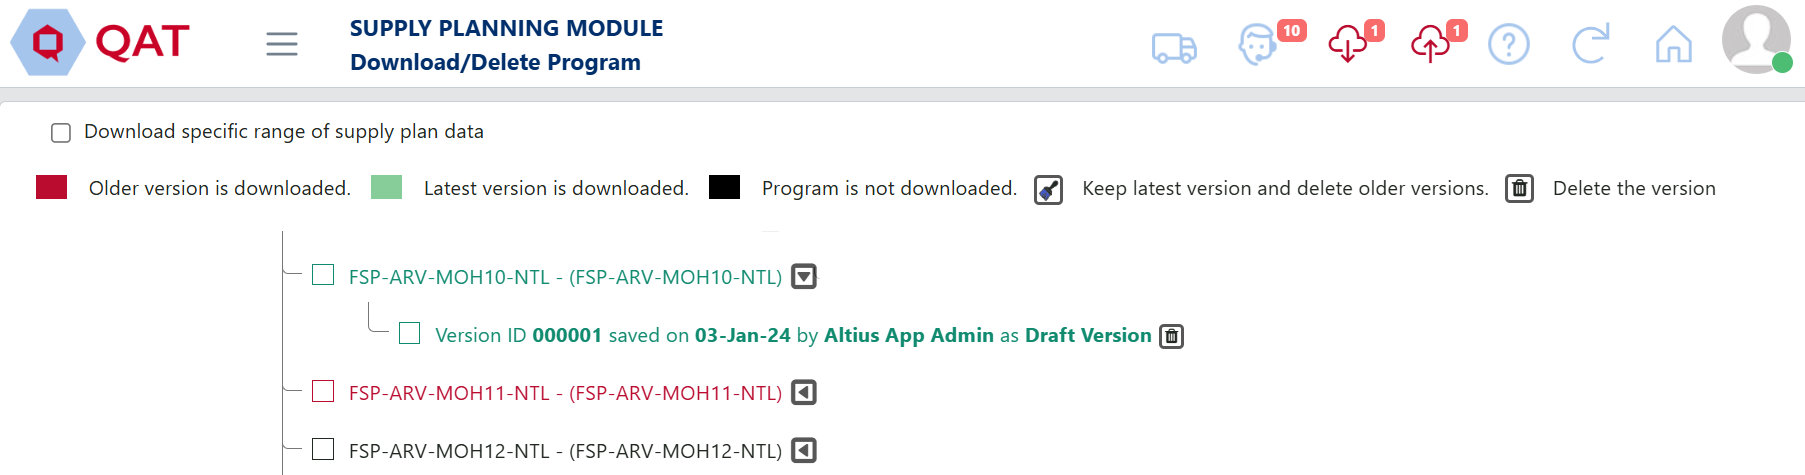
Figure 48: Load Program Screen
- To Download:
a. Select the checkbox next to the program you want to download. By default, QAT will download the latest version of the selected program.
b. (optional) Click on the triangle button
 next to the program to see all versions of the program. The five latest versions will be displayed. Click “see more” to view older versions. Use the checkbox to select which specific version(s) you would like to download.

Figure 49: Version Tree – how to expand
c. Click on the “Download” button to download the program to your system.
- To Delete or Clean up:
a. Click on the triangle button next to the program to see all versions of the program.
b. Select the trashcan icon
 next to the version of the program you want to delete. If you have multiple versions, you also have the option of clicking the clean-up icon
  to delete all versions except the latest local version.
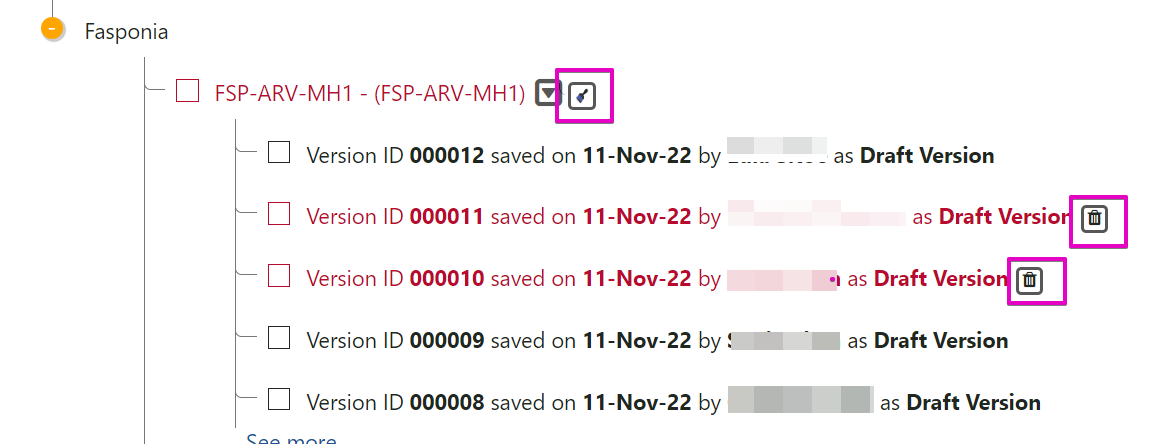
Figure 50: Download Screen Version Tree – clean up and delete icons
- (optional) In the supply planning module, users can download a subset of their supply plans as their programs start to have more historical data.
- To do this, the user clicks on “Download specific range of supply plan data” and selects the starting month/year for the data they will download.
- If “Download specific range of supply plan data” is checked, the version of the program selected will only show data starting from the desired date (minimum 18 months in the past).
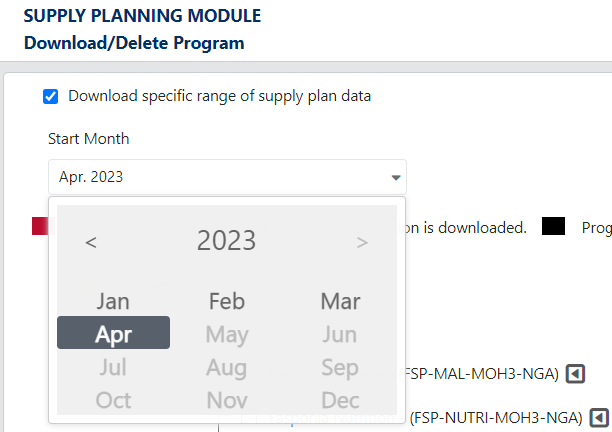
Figure 51 Download specific range of data
- The date range selection would apply to ALL programs selected for download. If the user wants to download one full program (program A) and one truncated program (program B), the user must complete the download process twice – one for the full program and another for the truncated program.
- Older data not downloaded always exists on the server and cannot be deleted or overwritten.
- When user downloads truncated program (v1), updates it, and uploads a new version (v2), the server version will include the entirety of the data, while the new local version will remain truncated with previously selected start date. User may delete that version and download the full v2 from the server, or v2 with a different range of data, as needed.
[!NOTE] If you download an older version, or if another user uploads a later version on the server after you download, you will see a message like the below any time master data sync happens (upon logging in, upon downloading new program, or if manually requested by user).
- If you select “OK”, the latest server version will be downloaded and your local version will be permanently deleted. Please only select “OK” if you are okay with discarding your changes or if you have not made any changes.
- If you select “cancel”, no action will be taken and you will remain with your local version.
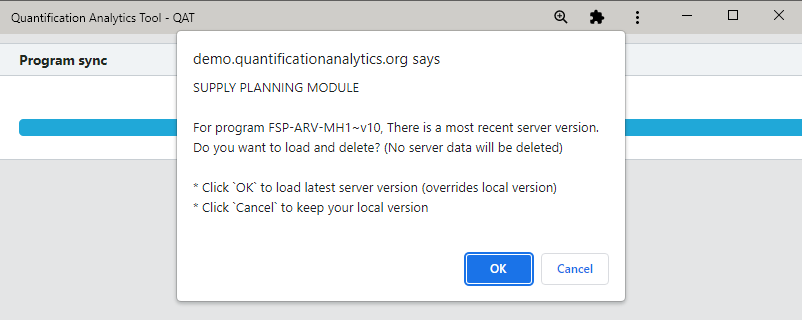
Figure 52: “More recent server” warning on user login
3.C. Upload.
- Who?
- Supply Planning: Application/Realm/Program Admins, and Program Users. Not available or needed for Report Viewers.
- Forecasting: Application/Realm/Program Admins and Program Users. Not available or needed for Forecast Viewers.
- Why?
- Uploading as draft:
- Supply Plans/Forecasts: Share the local version of program data with the server and other users (uploading as draft).
- Uploading as final:
- Supply Planning: Indicate to all users that the supply plan has been fully updated, and also to initiate the supply plan review process.
- Forecasting: Allow final forecasts to be importable into the supply plan.
- Uploading as draft:
- What happens when a user uploads a program? When the user uploads a Program, it becomes the latest version on the server and is available for all other users to download or view.
- Note that if a truncated version of the supply plan program was downloaded (e.g. v10), when the user uploads their local version (becoming v11), the new version on the server will contain all the data, not just the subset the user worked with.
- When? The user must be online to upload a program.
3.C.1. Supply Plan Module - How to Upload a Program:
- Ensure you are in the Supply Plan Module.
a. Go to “Program Management” > “Upload Version.”
b. Or, click the upload icon
 in the top right bar in QAT.
 - Use Program dropdown to select the appropriate program, if it is not already selected (only downloaded programs will be visible).
- Select a Version Type using the dropdown: a. Draft Version: Indicates the supply plan is a work in progress. Use this to share a supply plan with others, but not ready to be submitted into the supply plan review process. b. Final Version: Indicates that the supply plan has reached a final status, and is being submitted to the supply plan review process. Note that QAT will not allow the user to upload as final with any “Open” issues in the QAT Problem List. Please use the QAT Problem List (see Closing and Addressing Problems) to mark any open issue as “Addressed” with an explanatory note, or move issue to “in compliance” via data entry first.
| Feature | DRAFT | FINAL |
|---|---|---|
| Must be online to upload local version to server | ✓ | ✓ |
| Data sent to linked ERP system(s) | ✕ | ✓ |
| ‘Open’ issues allowed on QAT Problem List | ✓ | ✕ |
| Supply Plan Reviewer will be informed | ✕ | ✓ |
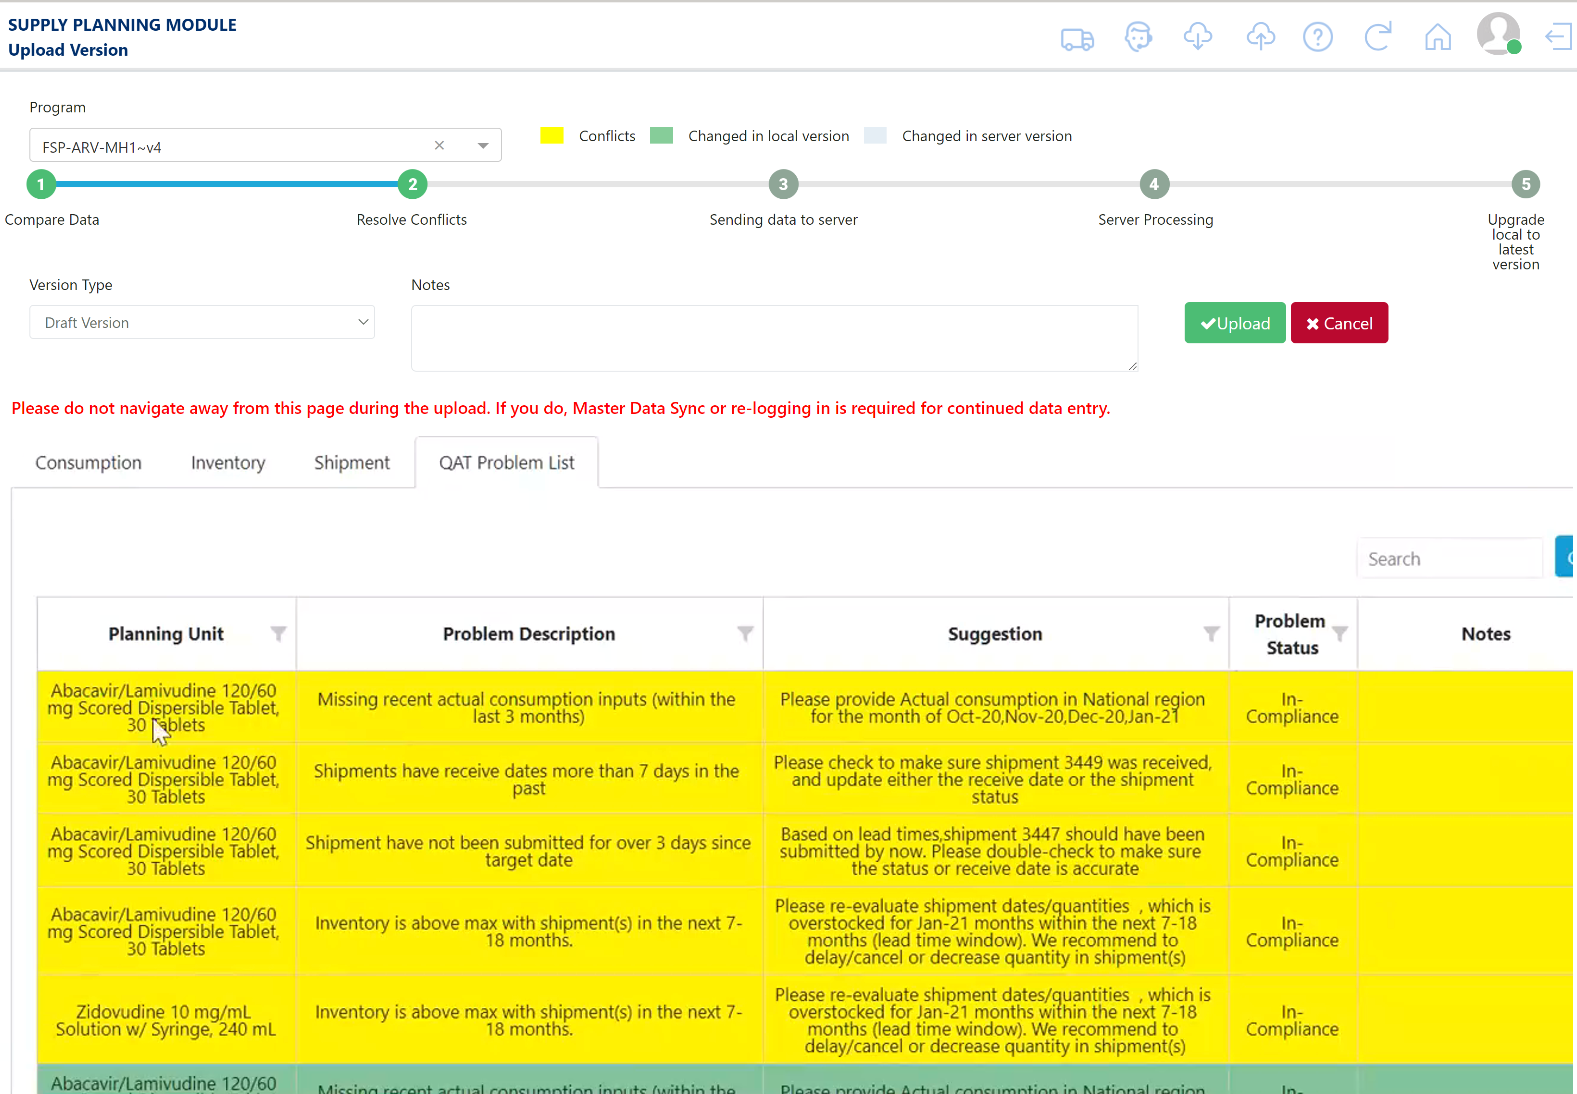
Figure 53 Upload Version
Figure 54 Uploading Supply Plan as Draft vs Final
- In Notes, type any overall notes about this version, such as summarizing the major changes made to the supply plan and the reasoning behind those changes.
- In the 4 tabs – Consumption, Inventory, Shipment, QAT Problem list – QAT will display a detailed comparison of supply plan details between the “Local version” and the “Server version.” Review each tab for any highlighted records. Yellow records require your action before you can upload the supply plan.
- Legend Explanation:
- Green: Represents changes that have been made in the local version; by uploading your program, these changes will save to the online server as a new version.
- Light blue: Represents changes made by another user that has already been uploaded to the live/online version – because this is a data point that you did not edit, the server version will persist for this/these records.
- Yellow: Represents a conflict in data between the local version and the server version for the same data cell. You must resolve all yellow conflicts before the Upload button appears. To resolve a conflict, right-click on the relevant row, and select “Resolve Conflict.” In the pop-up screen, choose whether to keep the local version of the data or the server version of the data.
- Legend Explanation:
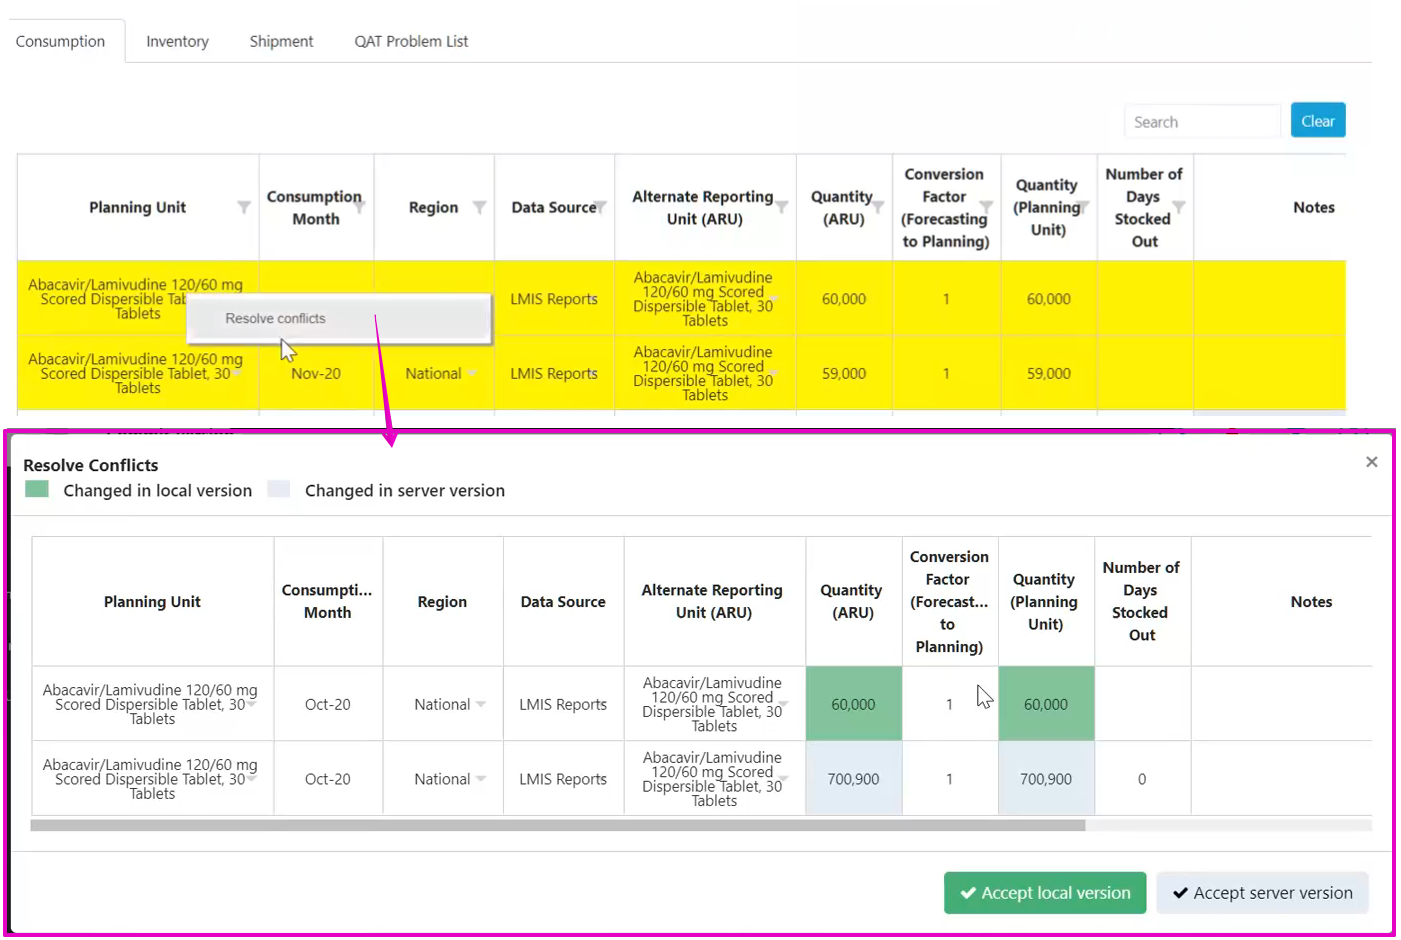
Figure 55 Resolving Conflict while uploading supply plan
- After reviewing all updates and resolving all conflicts, click the “Upload” button. QAT will provide a confirmation message.
- (For final) Supply planners and supply plan reviewers will receive an email notification confirmation that their supply plan has been uploaded as final.
- (For final) Supply planners, program admins and supply plan reviewers, realm admins, program users, data viewers and supply plan viewers will receive an email notification when their supply plan is rejected. They can also check the status of their supply plan review in the Supply Plan Version and Review Report.
3.C.2. Forecasting Module – How to Upload a Program:
- Ensure you are in the Forecasting Module.
a. Go to “Program Management” > “Upload Version.”
b. Or, click the upload icon
 in the top right bar in QAT.
 - Use Program dropdown to select the appropriate program, if it is not already selected (only downloaded programs will be visible).
- Select a Version Type using the dropdown: a. Draft Version: Indicates the forecast is a work in progress. Use this to share a forecast with others. b. Final Version: Indicates that the forecast has reached a final status and can be imported into the supply plan. Note that QAT will not allow the user to upload as final if there are no changes between the latest server version and the version being uploaded.
| Feature | DRAFT | FINAL |
|---|---|---|
| Must be online to upload local version to server | ✓ | ✓ |
| Forecasted consumption can be imported into the supply planning module | ✕ | ✓ |

Figure 56 Upload Version
Figure 57 Uploading Forecast as Draft vs Final
- In Notes, type any overall notes about this version, such as summarizing the major changes made in the forecast and the reasoning behind those changes.
- In the 5 tabs – Version Settings, Planning Unit, Consumption, Tree, Selected Forecast – QAT will display a detailed comparison of details between the “Local version” and the “Server version.” Review each tab for any highlighted records. Yellow records require your action before you can upload your version.
- Legend Explanation:
- Green: Represents changes that have been made in the local version; by uploading your program, these changes will save to the online server as a new version.
- Light blue: Represents changes made by another user that has already been uploaded to the live/online version – because this is a data point that you did not edit, the server version will persist for this/these records.
- Yellow: Represents a conflict in data between the local version and the server version for the same data cell. You must resolve all yellow conflicts before the Upload button appears. To resolve a conflict, right-click on the relevant row, and select “Resolve Conflict.” In the pop-up screen, choose whether to keep the local version of the data or the server version of the data.
- Legend Explanation:
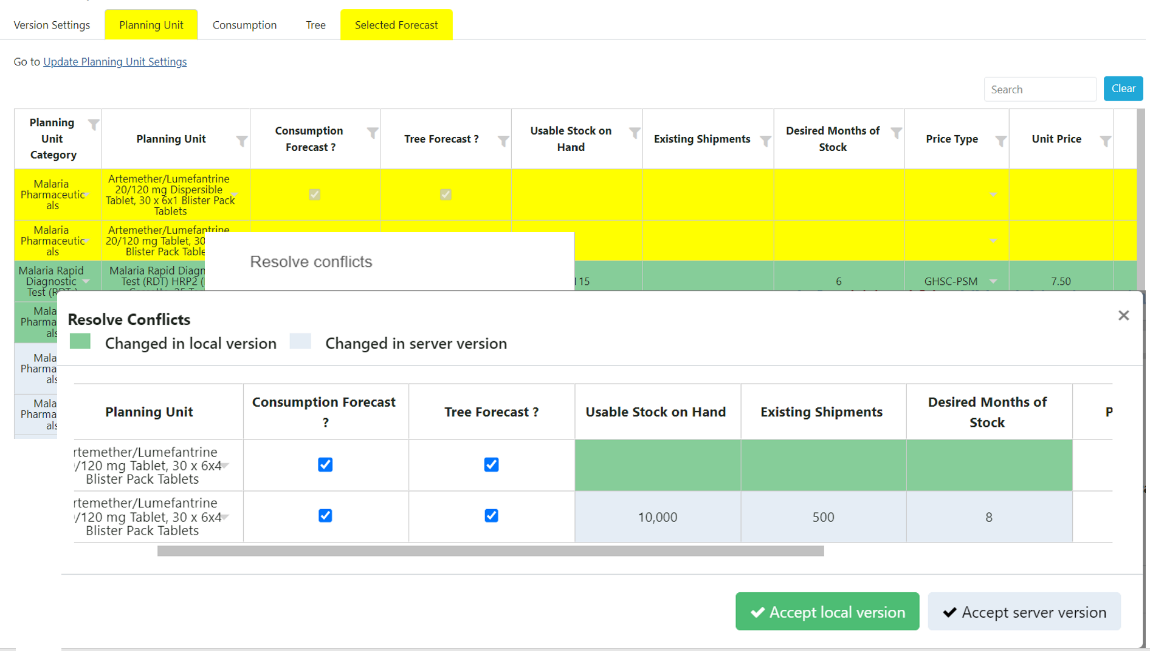
Figure 58 Resolving Conflict while uploading forecast
- After reviewing the table and confirming the selected forecasts, click the ‘Upload’ button. This will open up a separate pop-up window (“Forecast Validation”). The Forecast Validation screen provides users the ability to double-check their work and anything they might have missed when creating and selecting the forecast(s).
- The user has the option to view the different validations for only the selected forecasts for each planning unit, or to view the validations for all forecasts in the program. To change this setting, check/uncheck the box in the top of the screen.
- For ease of access, the validations that are in blue font are linked to the page in QAT where the validation is being flagged. For example, if a forecast is not selected for one of the planning units, clicking on the planning unit in the validation page will direct you to the Compare and Select screen where you can select a forecast.
- Section 1 flags any active planning units that do not have a selected forecast.
- Section 2 looks at all active planning units that use consumption-based forecasting. 2a will flag if any of the consumption forecasts are missing actual consumption values (gap). 2b will flag any planning units that do not have at least 24 months of consumption data. If the checkbox at the top is selected, then only the planning units with a selected consumption forecast will be flagged. Planning units with a selected tree forecast will not be flagged in this section.
- Section 3 looks at all active planning units that use tree forecasting. Planning units with a selected consumption forecast will not be flagged in this section. 3a flags any planning units that do not appear on any tree. 3b flags any tree branches that are missing a planning unit. 3c flags any tree nodes where the parent’s child nodes don’t add up to exactly 100%. In section 3c, clicking on the + icon will expand a table with details on which nodes and % are being flagged.
- Section 4 compiles all of the notes across the different screens in the forecasting module. 4a will display notes from the Data Entry & Adjustment screen. 4b will display notes from the ‘Manage Tree’ screen. These notes include both tree-specific notes and scenario-specific notes. 4c will display notes from the ‘Manage Tree’ screen, specifically the notes in each node.
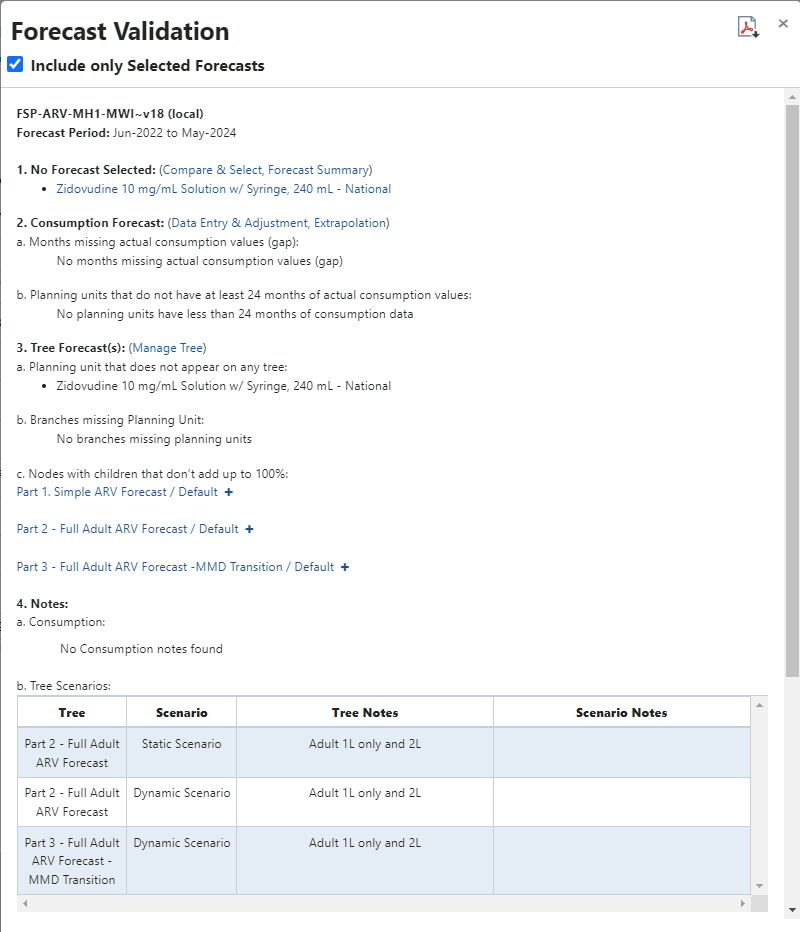
Figure 59: Forecast Validation
- After reviewing all validations and resolving any issues, click the “Okay” button to upload. QAT will provide a confirmation message.
3.D. Supply Plan Version and Review (Supply Plan Module Only).
- Who? This function is available for Application/Realm/Program Admins, Program Users, Supply Plan Reviewers, and Supply Plan Viewers.
- When? The user must be online. Supply Plan Reviewers will receive an email from QAT whenever a supply plan is uploaded as final (i.e. ready for review).
- Why? This function allows users to review the supply plan review status of supply plans.
- Supply planners (program admins & users) can check on the status of their review.
- Supply plan reviewers can view the review queue.
- Supply Plan viewers can check on the status of supply plan reviews.
- How?
- Go to “Program Management” > “Supply Plan Version and Review” and the below screen will be displayed. Select the Report Period, Country, Program, Version Type, and Status. In this table, users can see the status of all supply plans and any version comments. Users can also use the search, filter and sort options to find specific programs.
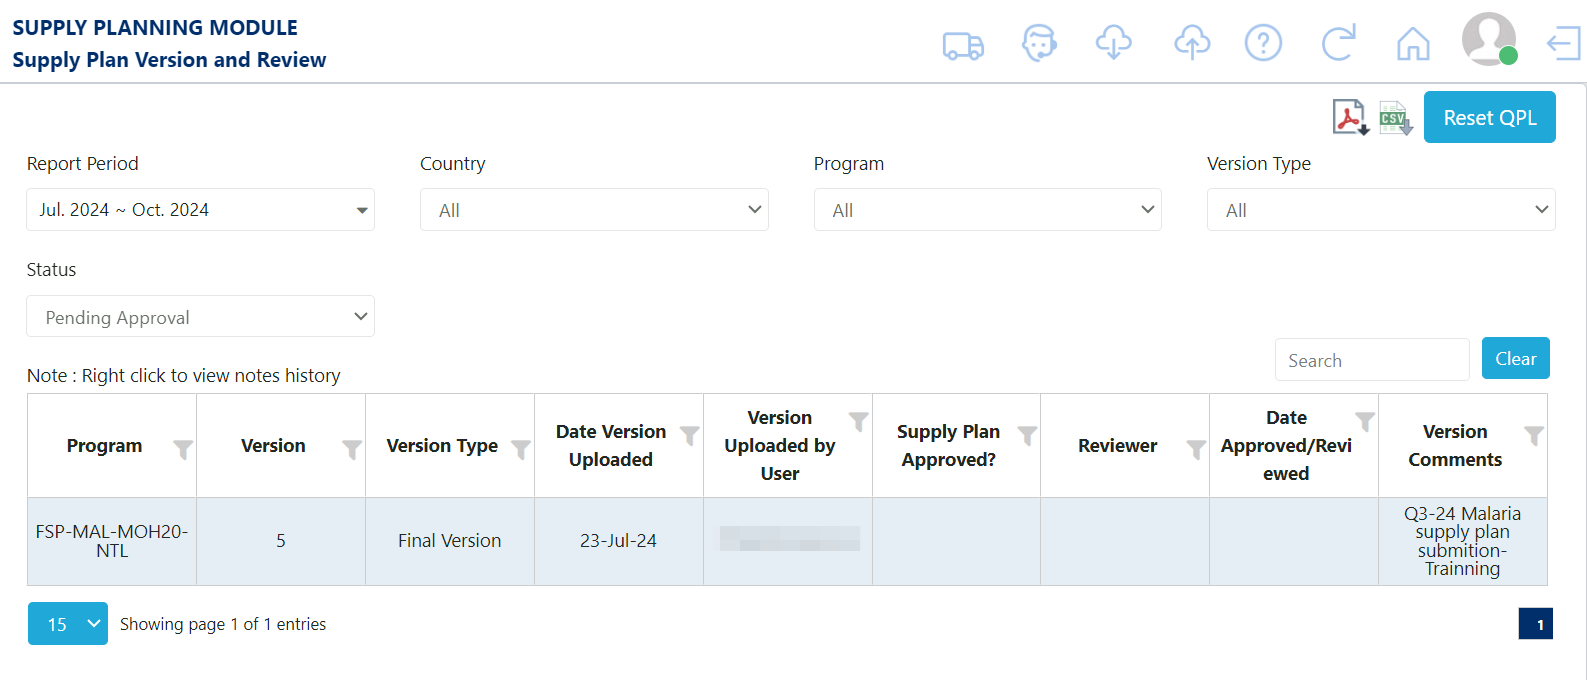
Figure 60: Supply Plan Versions and Review
- Click any row in the table to open the details for that supply plan.
For Supply Plan Reviewers ONLY:
- a. Use the first tab “Supply Planning” to review the stock status and data elements of any given planning unit.
- b. Use the second tab “QAT Problem List” to review any issues within the supply plan.
- i. Use the “Reviewed” column and check the checkbox in each row as you review them. All issues other than “in compliance” or “resolved” must be checked as “reviewed” in order for you to approve or reject the plan.
- ii. Use the “Enter Reviewer Notes” column to note any feedback for the supply planner.
- iii. Update the “Problem Status” as needed – Leave issues as “Addressed” if you want the supply planner to review them again in the next review cycle (the issue will become “open” in the next version). Mark issues as “Resolved” if they don’t need to be reviewed again even in future review cycles. Mark issues as “Open” if you want to communicate to the reviewer that they need to update their comments.
- iv. If there is a problem that should be addressed by the supply planner, but is not automatically flagged by the QAT Problem List, the reviewer can add a manual problem by clicking the “+” symbol
 in the top right of the screen.
-
- Manual problems must have an associated planning unit, criticality, description, and suggestion. These problems will be added as a separate row in the QAT Problem List for supply planners to address.
-
- c. After reviewing, change the status of the Supply Plan to Approved or Needs Revision, provide notes (mandatory), and click “Update”.
- i. Utilize the Version Notes History to view overall notes on the supply plan through time.
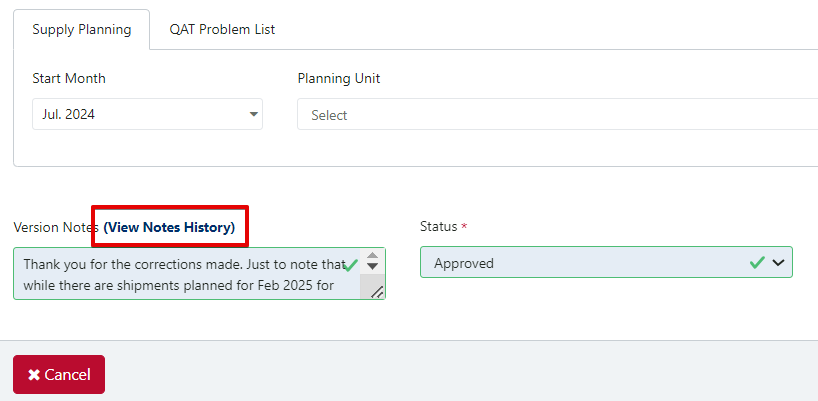
Figure 61: View Notes History Button
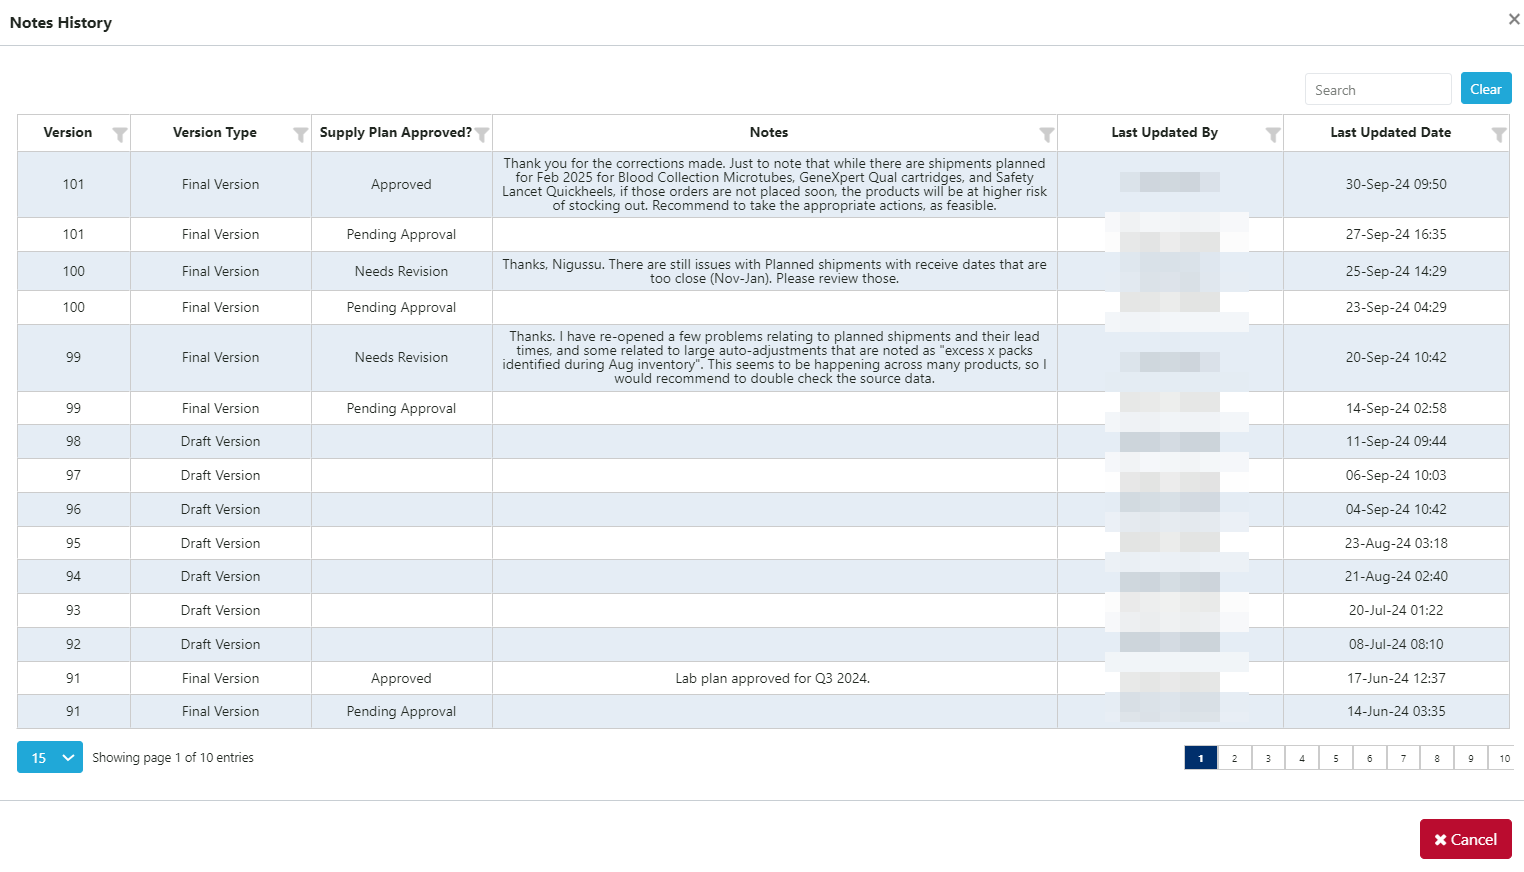
Figure 62: Version Notes History Example
- ii. Note: There is an additional status for “No Review Needed” that can be used when a duplicate supply plan is uploaded or a supply plan is uploaded outside of the submission period window.
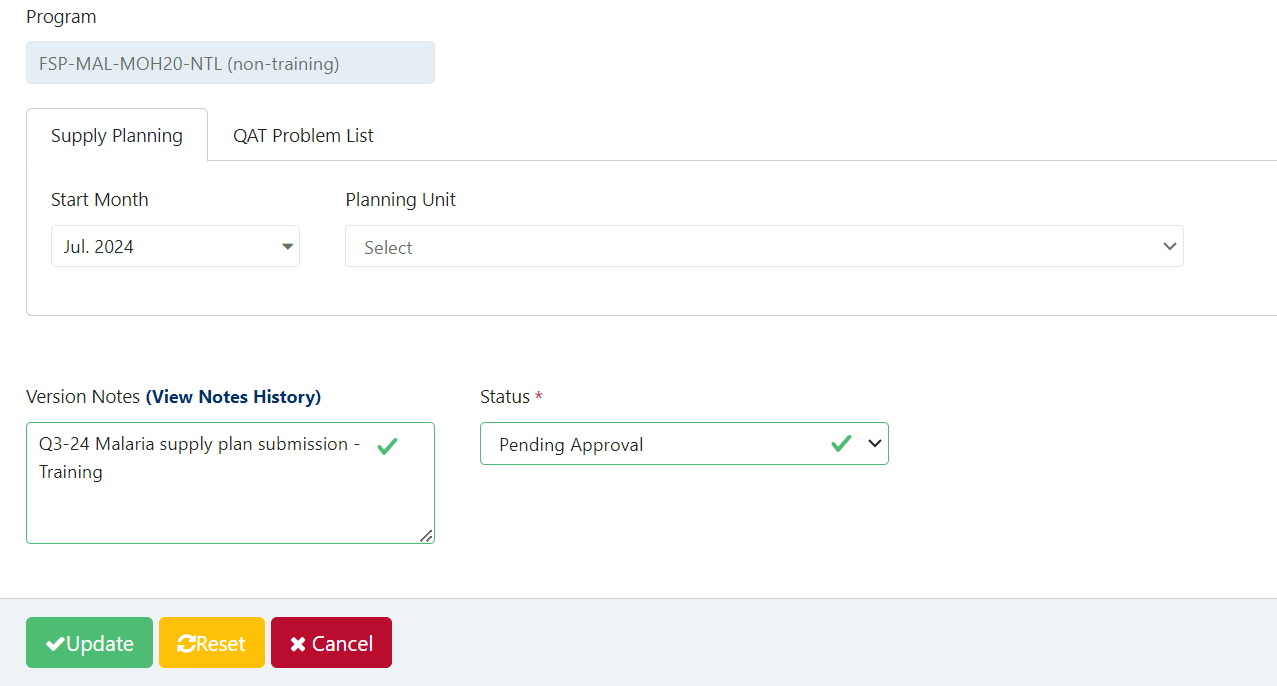
Figure 63: Supply Plan Version and Review (second screen)
- The user that submitted the supply plan for review will be notified by email when their submission is either Approved, Needs Revision, No Review Needed. Rules for supply plan review email notifications are as follows:
- a. Notification of Uploaded final supply plan:
- i. Sent to: All supply plan reviewers with access to that program.
- ii. Cc’d: User who uploaded the version.
- iii. Bcc’d: All program admins with access to that program.
- b. Notification of Needs Revision supply plan:
- i. Sent to: The user who uploaded the supply plan.
- ii. Cc’d: Reviewer who requested revisions to the version.
- iii. Bcc’d: All reviewers with access to that program as well as admins with access to that program.
- c. Notification of Approved supply plan:
- i. Sent to: The user who uploaded the plan.
- ii. Cc'd: All users who have access to that program except for app admins and reports viewer.
- d. Notification of No Review Needed supply plan:
- i. Sent to: The user who uploaded the plan.
- ii. Cc'd: The supply plan reviewer.
- a. Notification of Uploaded final supply plan:
3.E. Export.
- Who? This function is available for Application/Realm/Program Admins, Program Users and Supply Plan Reviewers. This function is not available or needed for Report Viewers.
- Why? The “Export Program” function is used when the user wants to export the program to his/her local machine. By using the Export function, Program data can be shared with others offline. For example, user A can export a program and save that file on a USB drive to share with user B, who is offline.
- What? The program data file will be exported in the zip format. The zip file contains all the data for that version of the program. Users can choose to export in encrypted or unencrypted format. This file can subsequently be shared with others to import into QAT, or, if unencrypted, analyzed outside of QAT.
- Note: if the user downloaded a version with a selected range of data, the export will also be for that selected range of data.

Figure 64: Export Program Screen
- How to export a program:
- Determine whether you would like to export from the forecasting or the supply planning module, and navigate to the correct module (See Section 2.J Navigation and Menu Bar). If you only have access to one module, you can ignore this step.
- Go to “Program Management” > “Export Program.”
- Select the program to be exported using the dropdown. Programs must be first downloaded before exporting is available. (See Section 3.B Download/Delete Program).
- If the program was downloaded with a subset of data, the export will also be limited to that same subset.
- Determine whether or not you need an unencrypted version.
- For importing back into QAT, leave the “Do you want to encrypt” checkbox checked.
- For analyzing data outside of QAT, uncheck the “Do you want to encrypt” checkbox.
- Click on the “Submit” button to save the changes.
- A browse window will pop up. Select the folder you want to save the exported file in. Then click “Save.”
- The .zip file will now be saved in the selected folder.
- Share the .zip file with others as needed.
3.F. Import.
- Who? This function is available for Application/Realm/Program Admins, Program Users and Supply Plan Reviewers. Not available or needed for Report Viewers.
- Why? The “Import Program” function is used when the user is working on the program in offline mode and wants to open a program that has been exported into a .zip file.
- Note: The program data file must be saved in the zip format. For example, user B can (while offline) import a program that user A exported and saved to an external device.
- Note: If the user exported a version with a selected range of data, the import will also be for that selected range of data.
- When? This function can be used when offline or online.
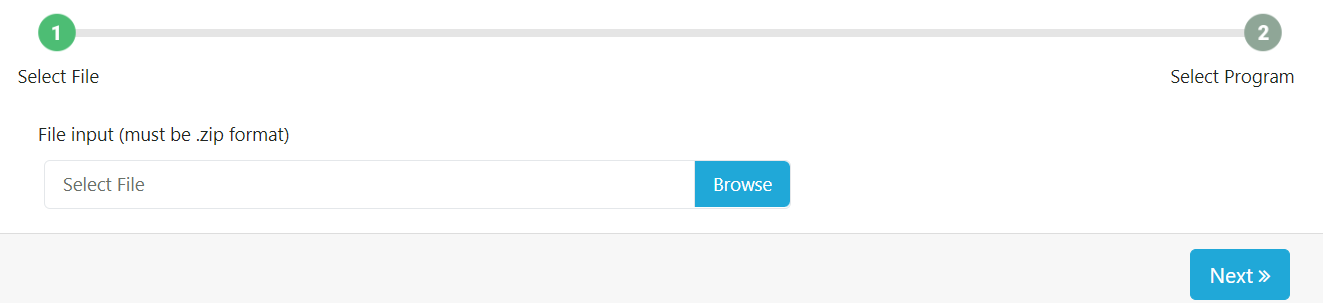
Figure 65: Import Program Screen
- How to import a program:
- Determine whether you would like to export from the forecasting or the supply planning module, and navigate to the correct module (See Section 2.J Navigation and Menu Bar). If you only have access to one module, you can ignore this step.
- Go to “Program Management” > “Import Program.”
- Click “Browse.” Choose the required file that needs to be imported. The selected file must be in the zip format. The zip file may have multiple programs.
- Click “Next.”
- Select the required program to import (if only one program is in the file, it will be auto-selected).
- Click on the “Import” button to import the program into the local machine.
3.G. Version Comparison.
Purpose: Enable users to view and compare 2 different versions of the same forecast program. In this screen, users will select a forecast program to view and from there select 2 versions of that program to compare. The user can select both local and server versions as well as draft and final versions. If the version has a * next to it, this indicates that the version is final. Once the user has selected all of the dropdowns, a table will appear comparing the two forecast versions. For each planning unit and region combination, the table will display the selected forecast, forecast quantity, and notes for each of the 2 forecast versions. This screen is only for viewing purposes and no changes can be made to the selected forecasts in this screen.
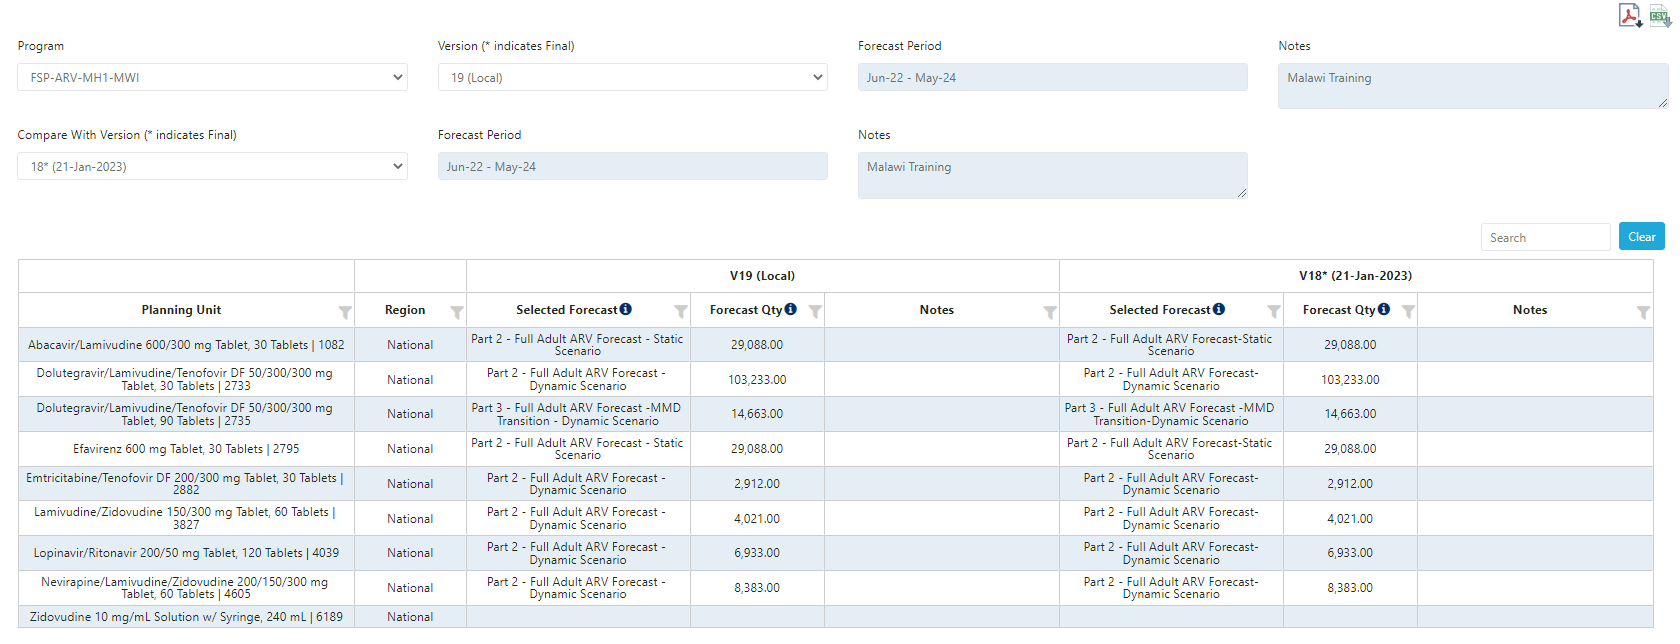
Figure 66: Version Comparison
Using this screen:
- First, select from the output filters from the dropdowns. This screen only compares 1 program at a time, but allows the user to compare multiple versions of that program. The user has the ability to compare any combination of final and draft versions as well as local and server versions. If the version has a
*next to it, this indicates that the version is final. The version notes and forecast period will appear greyed out as these are non-editable fields. To update these fields, go to ‘Update Version Settings’. - Once all dropdowns are selected, a table will appear with data across for both forecast versions that were selected. For each planning unit and region combination, the table will show the selected forecast, total forecast quantity for the forecast period, and any forecast notes for that selected forecast. Each side of the table represents 1 of the 2 forecast versions selected. The top row of the table shows which version the side is showing data for.
- This screen can be exported in both PDF and CSV format by clicking the icons in the top right of the page.